Click on the diagram to get a better resolution copy downloaded as a pict file (open it with Simpletext and print it out).
I have built two of these myself, exactly as described, so I know this design works. However, I make no promises that you will be able to do likewise, or that I will be able to help you if yours doesn't work. I don't mind trying to help if you contact me, and most people who have done so have managed to get their interface going.
I also take absolutely no responsibility for computer or midi equipment which might be damaged during your efforts to build this device and get it working. It is theoretically possible for this to occur, especially if you connect the wires to the computer incorrectly, although it appears to be unlikely as none of the many people who have contacted me have run into any problems so far.
Midi interfaces for the older Macs with RS422 serial ports
probably are no longer available (except second hand) as Macs no
longer have those ports. The ones Apple used to sell were not only
pricey but they only had one Out as well. If you're handy with a
soldering iron you can build one for yourself for a fraction of the
price of a commercial unit (mine cost me about AUD$30 including the
box, but I did re-use the end off a broken mini-din 8 cable, plug
included of course, so that bit was very cheap) and this one doesn't
need a power supply and has three Outs (could be four if you
wanted).
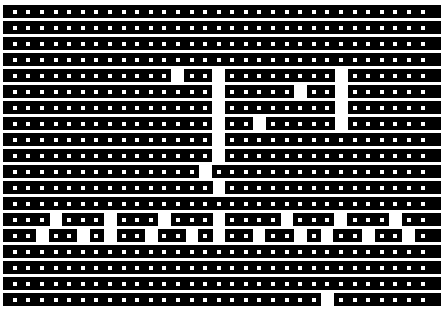
I used four board mounted midi sockets and strip-board to build mine
but there's no reason you couldn't do otherwise. The whole thing is
very compact and portable and designing a printed circuit board is
probably a waste of time given it's already so small.
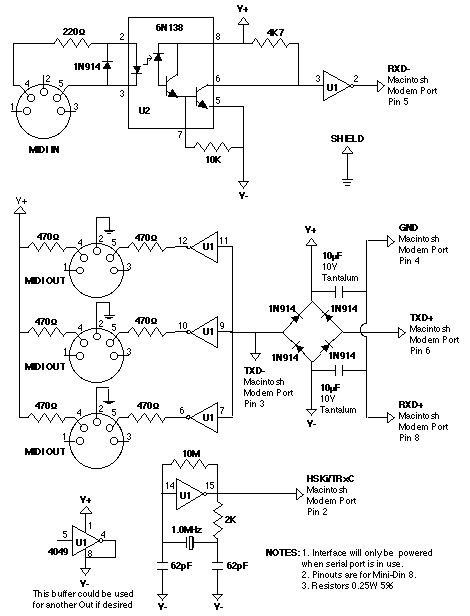
The circuit is based on Dale
King's Midi to Mac interface. His uses a 6N139 optocoupler which
isn't so readily available in Australia (his internal diagram of the
6N139 is actually incorrect, the 6N139 being, like the 6N138 I used,
a photodiode and two transistor job as opposed to some of the six pin
ones which only have one phototransistor). A 6N139, if that's what
you can get, will also work in this circuit without modification as
the pinouts are the same. If anything, the specs of the 6N139 are a
bit better.
The differences:
The rest of the circuit is the same as Dale's except I didn't
bother with the Thru switches Dale used. I think they complicate the
circuit unnecessarily, especially since you can't use this interface
without the software enabling the port. If you want to include them
you can get the idea from Dale's diagrams.
If you want a fourth Out, take the link from pin 5 of the 4049 to pin
7 instead of pin 8 and connect pin 4 to a socket in the same way as
the other Outs via a 470R resistor. Also, if you use chassis mounted
midi sockets, you can mount all the 470R and 220R resistors on the
sockets and make the board 7 strips narrower. The board I used was 19
strips wide and 31 holes long.
The length of the cable to the mac seems to be critically important
to the carriage of the signal down the RxD- line, probably due to the
combined resistance and capacitance of the cable. You should keep it
as short as possible, like less than a metre or so. The quality of
the cable is also important. You might get two metres to work if it's
very good quality but a poor one might only work if it's less than
50cm. If the Outs all work but the In doesn't then try reducing the
length.
If you can't get hold of a 1MHz crystal (Xtal) I have now included a
method of using a 2 or 4MHz one (as of Feb 1999 I can confirm this
method works as I have built a 4MHz version myself). See page
2.
Strictly speaking, all the midi out and thru ports (not the in
port!) should have both the shield and pin 2 connected to ground.
This does not appear to be absolutely necessary and I haven't really
made provision in the design to do so but you can if you want.
I have also recently added a 4PDT switch and a mini-DIN 8 socket to
my own interface to allow me to switch between my printer and my midi
interface without plugging and unplugging all the time. If you want
to do this too you can get the details from Michael O'Hara's Macdelux
design available here.
This option is not included in the design below. If you do use
Michael's idea, be very careful about the colour coding of the wires
he has included and don't assume they are correct. As far as I can
tell a standard Mac printer cable is wired as null modem, ie the
TXD+/RXD+, TXD-/RXD- and HSKi/HSKo pairs are swapped from one end to
the other so it depends which end of the cable you use. Check each
pin/wire pair with a multimeter!
Enough chit-chat. Here's the good stuff:
Click on the diagram to get a better resolution copy downloaded as a
pict file (open it with Simpletext and print it out).
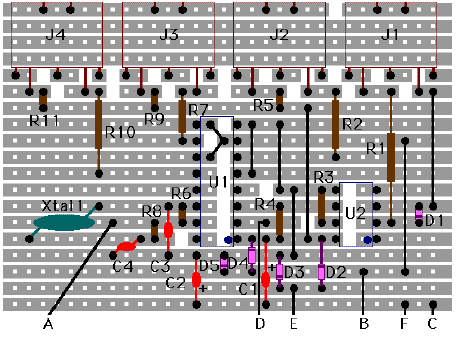
A = HSKi, Pin 2
B = TXD-, Pin 3
C = GND, Pin 4
D = RXD-, Pin 5
E = TXD+, Pin 6
F = RXD+, Pin 8
Note: Pins 7, 9 and 11 of the 4049 are linked by bridging the copper
tracks under the board.
R1: 220R
R2: 470R
R3: 10K
R4: 4K7
R5, 7, 9-11: 470R
R6: 10M
R8: 2K
C1,2: 10uF 10V tantalum
C3,4: 56pF (or 62pF?)
D1-5: 1N914 (or 1N4148)
U1: 4049 hex inverting buffer
U2: 6N138 or 6N139 optoisolator
Xtal1: 1.0MHz (you'll need some extra
circuitry if you want to use a 2 or 4MHz Xtal)
J1-4: 5 pin DIN PCmount
Misc: box, cable and Mini-Din 8 plug
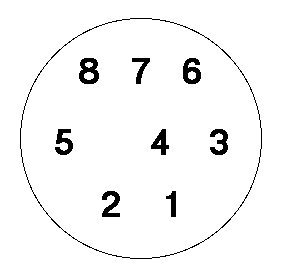
Note: this is looking at the back of the plug (into the socket)